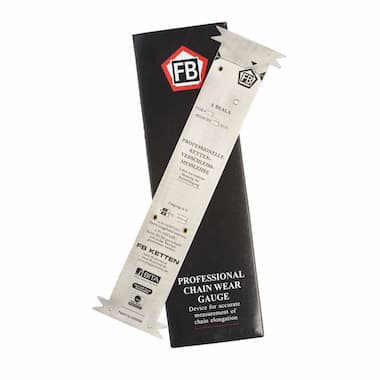
Chain Wear Gauge (Stainless Steel, German Markings)
Measuring Instrument
Price without VAT: 112.44€
Price including VAT: 136.05€ with VAT
Catalogue price excluding VAT:
114.73€
In Stock We update the stock availability information every 2 hours.
The goods we have in stock are usually ready for shipping or personal collection no later than the next working day. In case of personal collection, please do not come to pick the goods up before we contact you that the goods are ready.
Specifications
This standardized product may come from different manufacturers. We will provide you with the currently supplied brand upon request.
In the TYMA Product Catalogues you can find this material also described with the abbreviation SS.
Instrument Description
The KML chain wear gauge is a professional tool that accurately measures all common chain types wear with an imperial pitch ranging from 3/8″ to 3″. It is a patented gauge that is the most accurate and convenient tool for checking chain wear.
It indicates the percentage of elongation of the chain on a scale of 0.25 % from 0 to 4 %. If the instrument shows a 2 % or greater elongation, the red indicator will completely fill the window. Before further maintenance, you can see whether the chain can become a safety hazard.
Typical Applications
The measuring instrument is designed for measuring and checking elongation of roller, fleyer and other types of lifting and drive chains. Chains are used in many industrial applications. Especially for lifting equipment, they are considered to be safety-critical components and must be checked regularly.
An important value during operation is the chain wear elongation. Once the chain is stretched by 2 %, its replacement must be planned. If the elongation reaches 3 %, the chain must be replaced immediately or the device must be switched off until it can be replaced. From now on, the chain can no longer be used reliably.
We recommend regularly checking all common chains in the industry to reduce the risk of machine crash.
Key Features
-
Quick and Easy to Use
The chain wear gauge is very easy to use. You set the chain pitch (e.g. 1¾″) and check the elongation, no more time-consuming calculations are needed.
-
Safe and Accurate Measurement
The chain wear gauge is the most accurate device for measuring chain elongation on the market. Regular inspections with this device will ensure perfect operation of the chain gears.
-
Easy to Clean
The chain wear gauge can be easily cleaned with water and a little detergent.
-
Robustness and Durability
The chain wear gauge (KML) is made of stainless steel.
Measurement Procedure
-
Close the gauge to confirm calibration.
Close the slide fully and check the “Längung in %” (Elongation in %) window. In the event that the instrument moves out of calibration into the ± zones it will be as a result of wear to the moving components and should not, therefore, be used other than as a guide. Similarly, if the “V” jaws are damaged, the instrument may not perform accurately.
-
Identify the chain pitch and find out the number of pins for measurement.
Locate the arrows over the pin centres of the chosen outer link plate and the nominal pitch of the chain will appear in the “Teilung” (Pitch) window on one side of the instrument or the other.
Once the pitch has been determined the number of pins that the chain wear is to be measured over will appear in the adjacent “Messung über... Bolzen” (Measure over pins) window.
-
Close the gauge to confirm calibration.
Close the slide fully and check the “Längung in %” (Elongation in %) window. In the event that the instrument moves out of calibration into the ± zones it will be as a result of wear to the moving components and should not, therefore, be used other than as a guide. Similarly, if the “V” jaws are damaged, the instrument may not perform accurately.
-
Select the correct side of the gauge.
Please select the appropriate side according to the chain pitch.
SKALA A (SCALE A): “Teilung” (Pitch) – ⅜″ ⁄ ½″ ⁄ ⅝″ ⁄ ¾″ ⁄ 1″ ⁄ 1¼″ ⁄ 1½″ ⁄ 2½″ ⁄ 3″
SKALA B (SCALE B): “Teilung” (Pitch) – 1¾″ ⁄ 2″
-
Measure the chain.
The chain must be clean and the measurement must be made at a load of approximately 1 % tensile strength. If tension weights are not available, it is sufficient for lifting chains if the chains are preloaded with a normal load from the weight of the goods being transported or forks.
For lifting chains, identify the section of chain that regularly runs over the pulley as this part of the chain is the most susceptible to wear. Measurements must then be made in at least three separate locations on this section.
Place one “V” jaw of the instrument over the first pin of the selected section and then extend the slide until the other “V” jaw locates over the pin determined by the scale (e.g. 21 pin for a chain with a ¾″ pitch).
-
Check the chain elongation in %.
Check the “Längung in %” (Elongation in %) window. The percentage of wear will appear in the box at 0.25 % increments.
If the instrument shows a 2 % or greater elongation, the red indicator will completely fill the window. This is a warning that the chain requires replacing.
Warning: Protect from oils and grease. After use, wipe clean and store in the case provided. Do not expose to high temperatures that can deform and damage the gauge.
Documents for Download
Questions about This Product?
Don’t hesitate to contact us – our specialists will be happy to help with any questions about this instrument.


